Saturday 30 March 2013

Mini Egg Bags

Do you know I was looking everywhere for these 1" x 8" cellophane bags then realised they where in my Stamping Up catalogue all along, I have now had my eyes checked lol.
As I am frugal and had not eaten any of the eggs ( yeah right) I cut the bags in half so they held four eggs
 I used a square sizzix die to cut the tops, the stamp and punch I used to decorate with is also from Stampin Up.
I am going to have these sitting on my table for visitors to have over Easter.
They would be great for an Easter egg hunt especially if you could make them and not eat the eggs.

Wednesday 27 March 2013

Carrot Holder

 
For a long time now I have seen on various blogs these carrots by Lindt but I have not seen them in the shops where I live until this year, well I do live out in the sticks!!! And now the carrots are everywhere.
 There are instructions on how to make this holder on splitcoaststampers, but I made my own, mainly because I do not have some of the equipment needed on those instructions.
I started with the middle section which holds the carrots, I hand cut six circles for the carrots to sit in, as you can see in the picture below. Then I folded the sides down to make an upside down box with holes in.
I then built up around this, a small base in dark brown with a kraft card layer then a grass layer.

 The fence is made with coordinations card with a brown core which I inked and sanded
I had to put the bunny on as I accidently glued a red bit of card to the box while cooking tea. His ears and head are made from a circle punch, I hand cut his body and inked round it to hide the wobbly bits, his tail is from a mini flower punch which is also inked.


Monday 25 March 2013

Easter Basket

When I started to make this basket in my mind I had an image of a strawberry punnet.
I sat at my workspace with white card and this is what evolved.
I stared by making a box base, as in Sue's box, but bigger and deeper,  before I glued it together I used a punch to put bars in the basket, this way the basket is still strong but easy to work with.
I glued the sides at an angle so it is slightly 'V' shaped. I added DI to each bar to add definition.
I made the handle by punching a strip of 1" card on both sides and inked that as well.
Once the handle was in place I decided to add the brown trim top and bottom, this made the basket more alive somehow.
The flowers are a mix of card and felt also inked, I chose the colours to go with the chocolate eggs I had. As you can see the middle of the flower is a button.
I am really pleased with this basket even though it is not quite a strawberry punnet!!!

Friday 22 March 2013

Picnic Basket

I love making these picnic baskets, gingham style paper suits them so well.
These would be ideal to put an Easter gift in.
 I have used walnut stain DI on all edges of the basket and tag
The punch I have used is a Martha Stewart one.

Wednesday 20 March 2013

Bunnies for Easter

Recently I was lucky enough to be given a bag of mini MaltEaster Bunnies, I was also lucky enough to be given a box of Malteasers, but they did not last long, in fact they only just made it into my home.
I made these Easter goody bags using ATC cellophane bags, sizzix scalloped circle die and a scallop punch.
I sealed the bunnies in the bags, folded the scallop circle in half then stapled to the bag of bunnies and decorated by making the scallop punch shapes into daisies which I then edged with scattered straw DI, I shaped the daisies with my bone folder then added a button middle.
The daisies are glued in place over the sharpe edges of the staple.
Simple but effective.

Saturday 16 March 2013

Sue's Box


 Just after Christmas a lovely lady called Sue gave me a box to look at that she had, she wondered if I would be able to make one like it, as the one she had was a factory made one, so better late than never are my instructions on how to make Sue's box.
It is big enough to hold five 3"x 3" cards, or an edible goody, I'm thinking chocolate would be good.
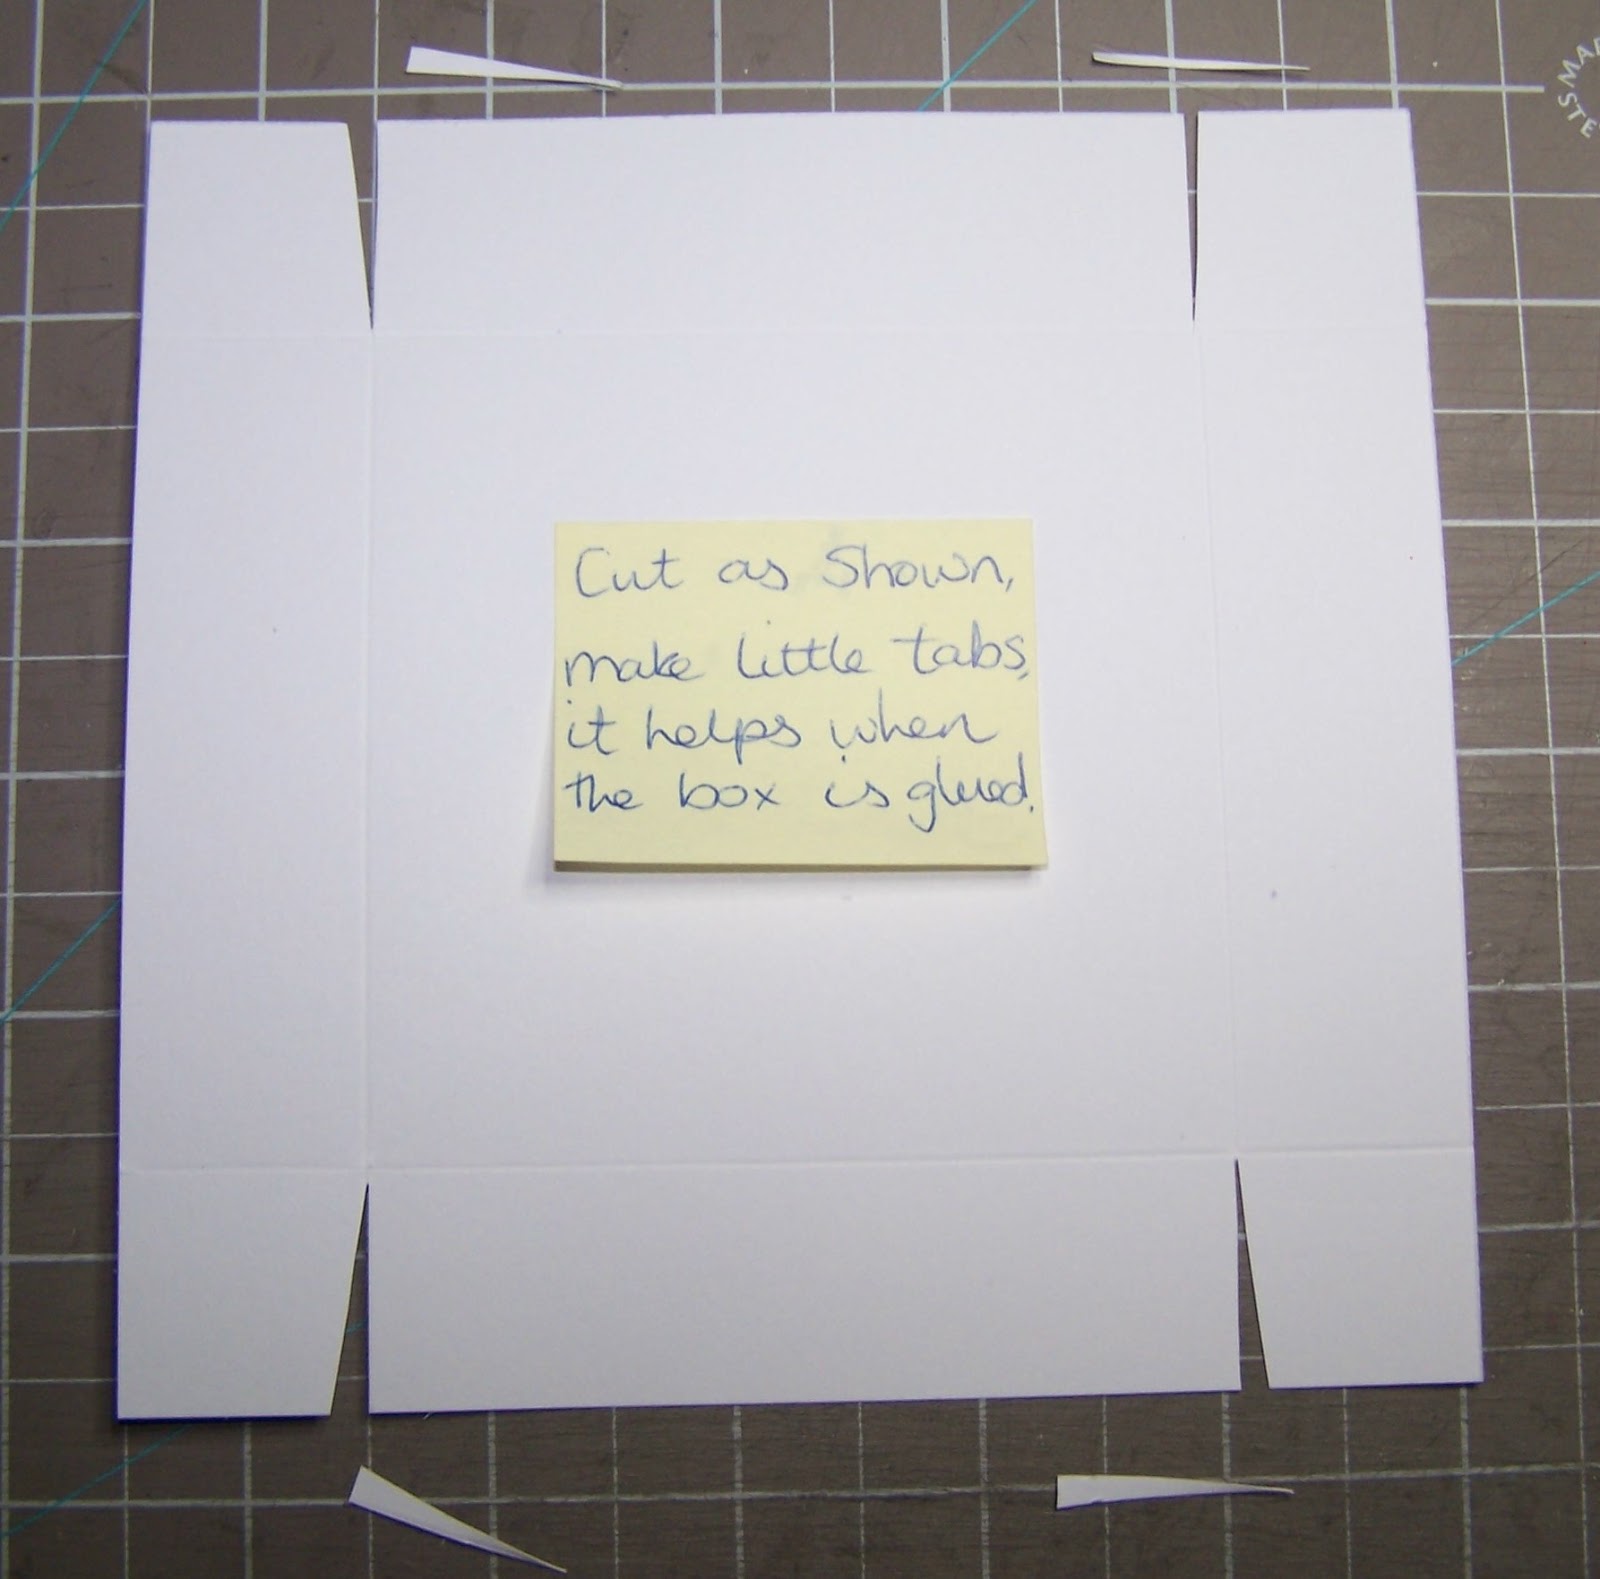
Start with  a square of card measuring 5 7/8" x 5 7/8", score all four side at 1", fold along the score lines then cut as shown on two opposite sides.
Put glue on the underside of the tabs and fold in and the sides up to make a box.
Next take a piece of card measuring 11 7/8" x 3 11/16", score from the left hand edge at 2 1/2", 3 1/2", 7" and 8". This makes the wrap around cover. 
On one short end measure down and mark 1 1/2" from the top, then measure and mark 1" along  both long sides. Join the marks up and cut off the outside bits. 
Now place the box on the cover, do not glue in place yet, the box may fit better one way, so twist it round until you are happy. Next punch two holes one about  1 cm in from the point and  one on the flap, this is where the ribbon is threaded through to keep the box tied up. I measured 1 cm down from the point when the box was closed to get the second hole, you may need to trim a slither off the large flap so it sits together nicely. The box still is not glued to the cover.
 I then took two pieces of ribbon knotted one end on each bit and poked it through the holes.
Next I inked all round the edges of the box and cover then finally attached the box to the cover. I attached the base and two sides of the box to the cover.
Finally I decorated the the flap that folds inside, the pointed flap and the outside edges .
I used a doily punch to make the lace which I then inked. The mini tags are punched from card covered in washi tape then also inked. I found it easiest to attach the strip of ribbon with skinny red tape after I had threaded the tags on it.
As I said at the start, this box will hold five mini cards, as yet I have not decorated my cards but when I have I will share them with you.
I hope this all makes sense.

Saturday 9 March 2013

Gift Boxes

Here are two quick ideas for last minute gift boxes, both have acetate on them. I have used my butterfly dies again as the acetate has butterflies on it.
 This box is made from the stampin up milk carton die, I cut two, one from card and one from acetate, I cut the flaps from the acetate box and the top from the card box then attached them together to make one tall milk carton.
The top is held together by a blue bulldog clip that has lots of ribbon tied to it.
 The next gift box is a set of three graduating pillow boxes.
I used the Tim Holtz pillow box die which is bigger than most for all three boxes. By cutting one box the placing it back on the die away from one edge a smaller pillow boxes can be made.
The trio of boxes are held together by blue and silver ribbon, the two floating butterflies are attached to very thin silver wire.
 
These would look good as wedding favours.

Wednesday 6 March 2013

Stationery Box

This is a present I have made for Mother-in-law, the stationery box idea has been around for ages.
When I made this I knew I would have to make it big enough to hold A6 envelopes, the size of the two front pockets was then determined by that .
 The stationery box is made from Kraft card to which I added patterned paper that I inked round.
 The stationery box has three parts to it, one for A6 cards, one for 3"x 3" cards and one for gift tags.
 These are the cards  I made to go in the box below are the matching gift tags.
The square cards are thank you cards with owls on, but I forgot to take a photo of them!!


Saturday 2 March 2013

Mothers' Day Card

This is the Mothers' day card I have made for my Mother-in-law, Pam.
I now have several butterfly dies and punches so mixed and matched them to create this card.
To make the card I first printed the words onto linen cardstock, the hardest part was deciding where I wanted to put the apostrophe in Mothers' or Mother's, after a lot of research I went with it after the s, I really think it all comes down to personal choice, it seems the big no no is to leave the apostrophe out completely!!
I laid the butterflies out and moved them about until I was happy then stuck them to the card.
To finish the card I added gemstones, pearls and stickles to the butterfly middles.